
I recently had to do some work that required me to measure roam times between a mobile device as it moved from Access Point to Access Point. The original requirement for this device’s application was 40ms, but luckily it was configurable. The customer wanted to start with the most stringent tolerance first, and then adjust based on findings. The lower the threshold, the more accurate the results for the application.
If communication stopped longer than 40ms, it would trigger a fault in communication between the device and the server. This lead to some interesting testing to try and achieve this goal (however unrealistic). Due to this little project, I became more familiar with the Savvius Omnipeek program, and how to measure roaming of client devices.
Lets take a look…
I’m only aware of three ways of achieving roam times below 40ms.
- Open Authentication
- CCKM
- 802.11r
The only option we could do was 802.1X+CCKM (since Open Auth was out of the question), and the device did not support 802.11r.
To be able to measure these roam times, I relied on using Omnipeek with multiple adapters in order to capture the roams over the air.
The first thing you want to do is fire up Savvius Omnipeek and start a New Capture.

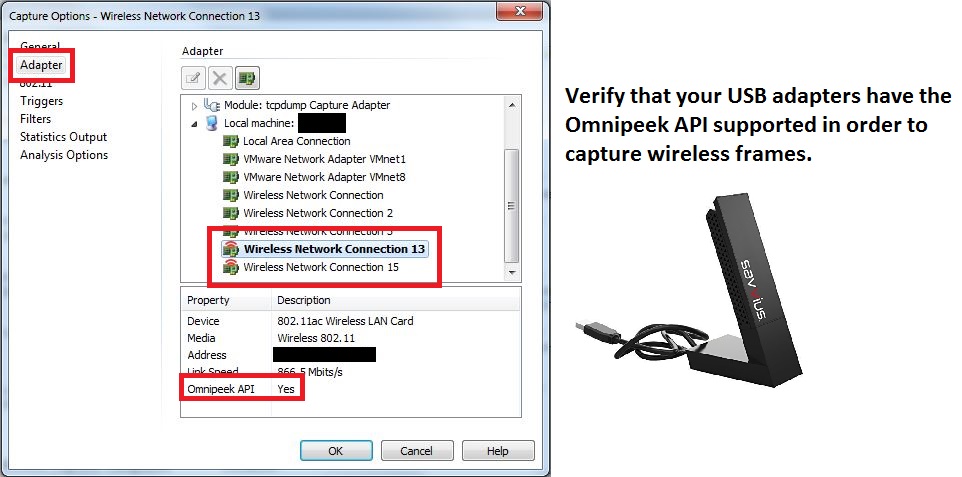
The next step is to choose Adapter and verify that you have supported adapters to choose from. For this demonstration I am using two Savvius 802.11ac capture cards which you can purchase here. As far as I am aware, you can use more than two adapters.
Now you will need to scroll up to the ‘Module: Aggregator/Roaming’ option and double click.

This will open up another window where you will see the multiple adapters that you have available to you. From here you will choose what frequency/channel you want each adapter to scan.
By doing this, you are dedicating 100% of the scan time per adapter, per channel. This ensures that you miss nothing (minus CRC’s) on either frequency. They will be automagically sliced together with their appropriate time stamps as they were received over the air.

Now you choose the Aggregator adapter and choose OK to start your capture.

Once the capture starts, you should start to see frames arriving on both channels that you selected.

The one caveat here is a big one. In order for this to work, you have to know beforehand what channels the two Access Points are operating on. So in a busy environment, this could be problematic to try and capture roams if you are not sure which Access Point your mobile device is going to be roaming to.
Once you’ve captured your roam, you’ll now need to measure it. This can be a sort of gray area as they’re are different ways to measure a roam.
- Last Data Packet on AP1 to next Data Packet on AP2
- First Probe Request to Reassociation Response
- First Authentication Request to Reassociation Response
- Maybe it’s something really cool that I don’t even know about. You know, and uh, and I started feeling… what? What, I thought we were in the trust tree in the nest, were we not?
Option 1 is what I like to call a ‘reality roam’. Meaning that the roaming process is seen by the end user as when my application stopped sending data, and started sending data. This measurement is the one I personally like least, because its 100% application dependent. If the application sends frames out every 20ms, or 40ms, or 150ms, the results will vary greatly.
Option 2 is getting closer to to a more accurate roam, but the problem here lies with Probe Requests. They are driver dependent, and timing can vary. Some clients like to Probe a bunch, others not so much. So this can lead to skewed results as well.
Option 3 is the one I favor and what I consider a ‘true roam’. This is strictly 802.11 exchanges between the client to the next AP. This is affected by what type of security is in use that dictates how long the exchange process will take. For example, a PSK roam hovers around ~50ms, while a new 802.1X exchange can take ~300ms or more. CCKM and 802.11r Over-the-Air can achieve sub-10ms roams. All of this takes place ‘between’ the Authentication Request and Association Response.
Option 4 is…well…just watch it here.
With the basic steps out of the way, lets take a look at an example of the device roaming between AP1 on channel 44 to AP2 on channel 48. Here you can clearly see the differences in time between the different roaming measurement methods.

The results would usually hover anywhere from as low as 40ms to 80ms for the application roam times. This varied due to the nature of RF, other clients in the air, how often the application sent frames (happens to be every 20ms), time taken to probe etc. Overall we decided to settle on a tolerance of 100ms to ensure false positives were kept at a minimum.
I hope you enjoyed reading, feel free to leave a comment.
Thanks!

For sure more than 2 adapters can be used for analyzing multiple channels. We have used up to 12, and have reports of customers doing the same. Here are a few things to consider. When connecting more than 2 adapters to a single USB port with a hub, a powered hub is a better choice. Every laptop seems to be different – some can support more devices with an un-powered hub and some less, but at some point the USB port can’t support all the devices and Windows becomes unhappy. And using USB 3.0 WLAN adapters is much better that USB 2.0 adapters. If you connect a large number of adapters and the traffic level is high on all the channels, you could easily saturate a USB 2.0 bus.
LikeLike
Jay. I agree with you, which is why I tend to lean towards not using any hubs if I can avoid it. Thanks for the feedback.
LikeLike