Cisco Meraki recently came out with some newer security appliances for their MX model lineup. While this is good news as they now have higher throughput capabilities, and some other stuff and things. The most intriguing new feature is that specific models now support built-in cellular connections (Verizon or AT&T for U.S.).
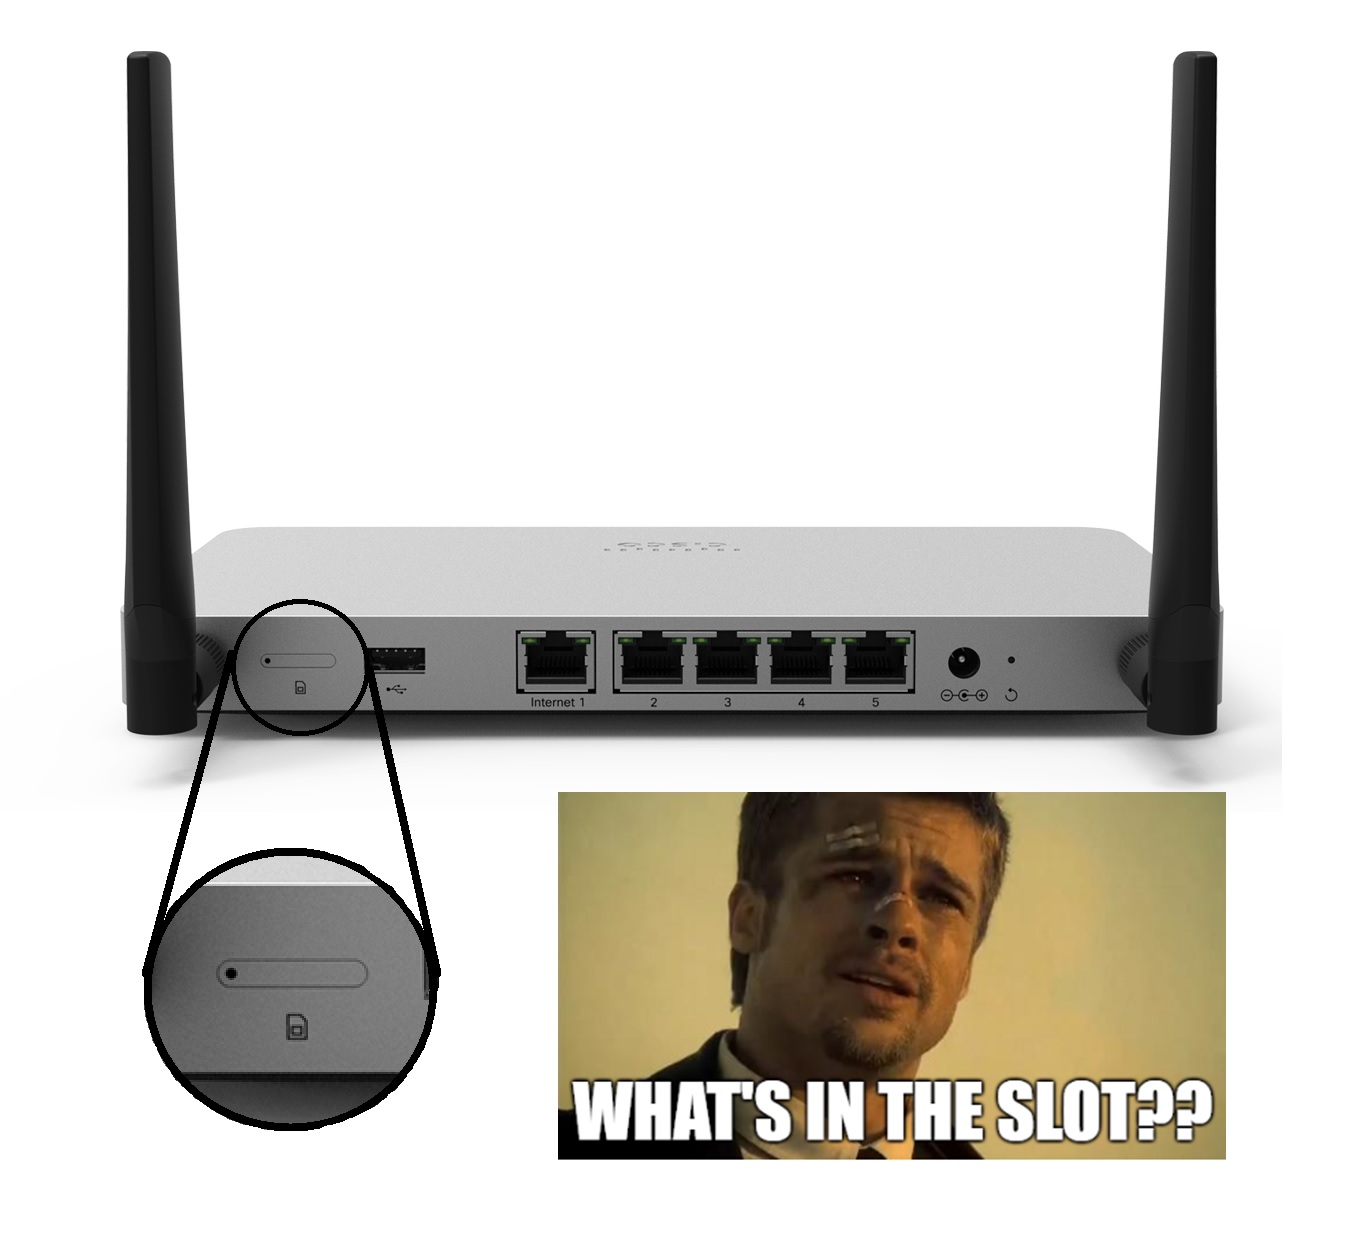
Specifically the MX67C and MX68CW have a new SIM slot with an internal LTE modem with the following specs:
- 1 x CAT 6, 300 Mbps LTE modem
- 1 x Nano SIM slot (4ff form factor)
You can review their entire MX family datasheet here.
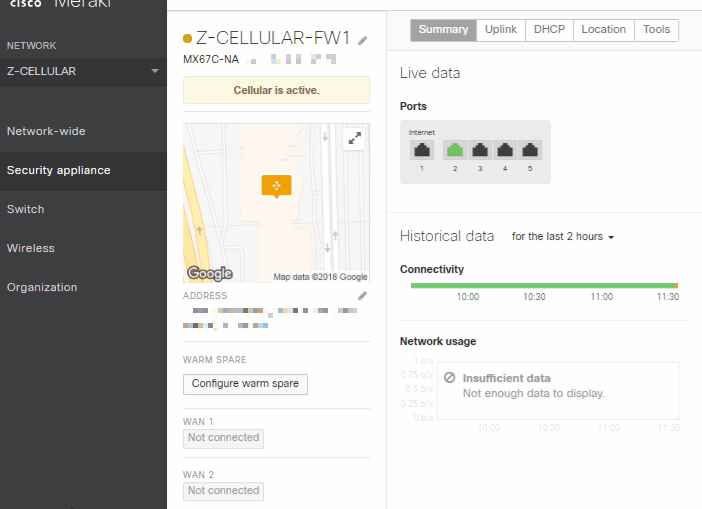
Cellular
***For this blog my MX appliances are running version 14.34 firmware.
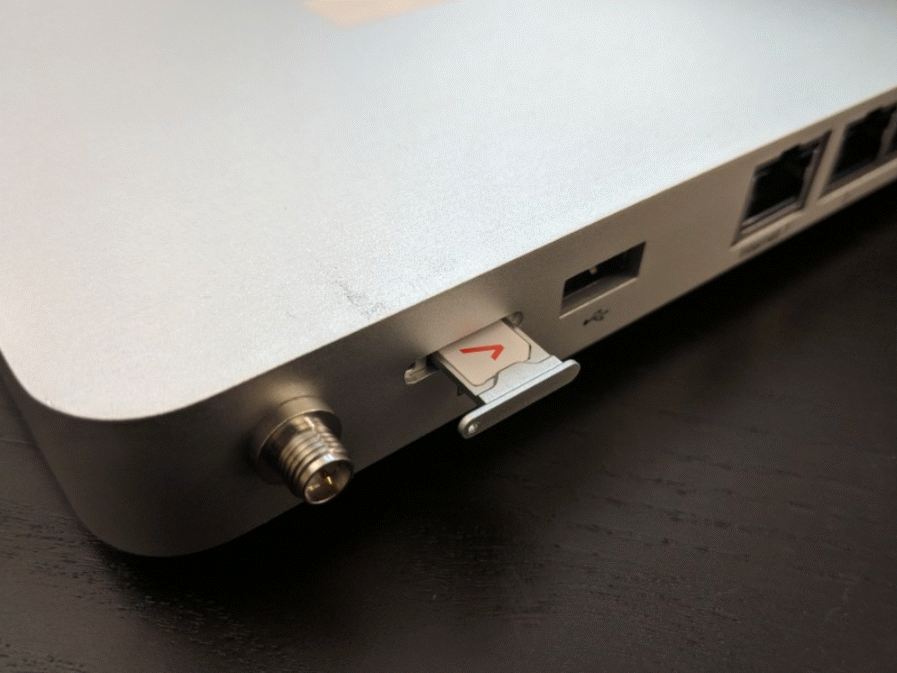
First thing you’ll need to do is insert the Nano-SIM card (4ff form factor) into the SIM slot, connect both of the antennas and power it up. I did not see a method for bringing up the appliance 100% on an LTE connection, as the local status page doesn’t seem to have any configuration options for cellular. So it would appear that having a hardwired method for bringing the appliance online first is a requirement, as the Cellular feature is disabled by default in the dashboard (at least it was for me).
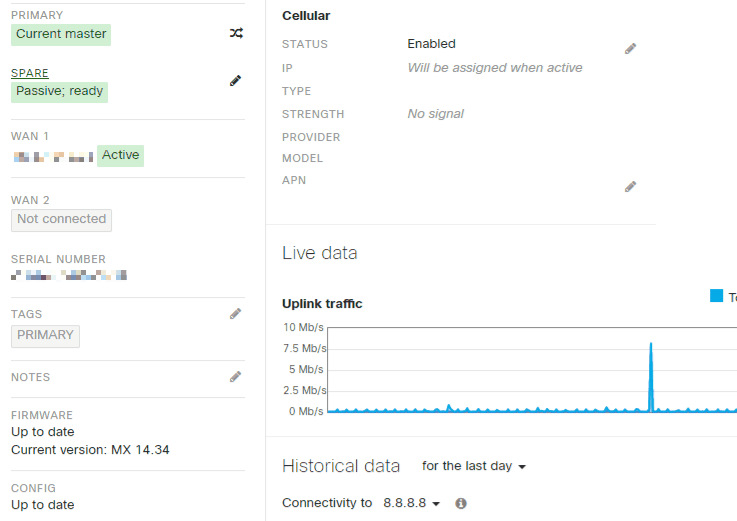
Inside the dashboard go to Security Appliance>Appliance Status>Uplink
From here you’ll need to Enable the cellular interface and wait for it to register and come online.
Below is what you should see for the registration/connecting process.
In addition you can get more advanced cell signal statistics here:

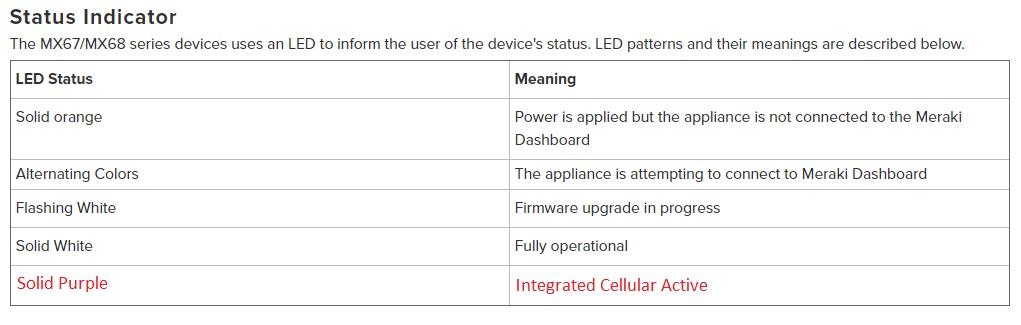
The MX67C/MX68CW installation guide here will also assist you with this process. I noticed though that inside the guide, the LED Status section could use some updating. When the WAN1 or WAN2 links are active, the LED indicator on the front of the MX appliance will show a white LED light. However when the Cellular connection is the active connection, it changes to a light purple color.


So they need to update their LED status with something like this:
Performance Increase
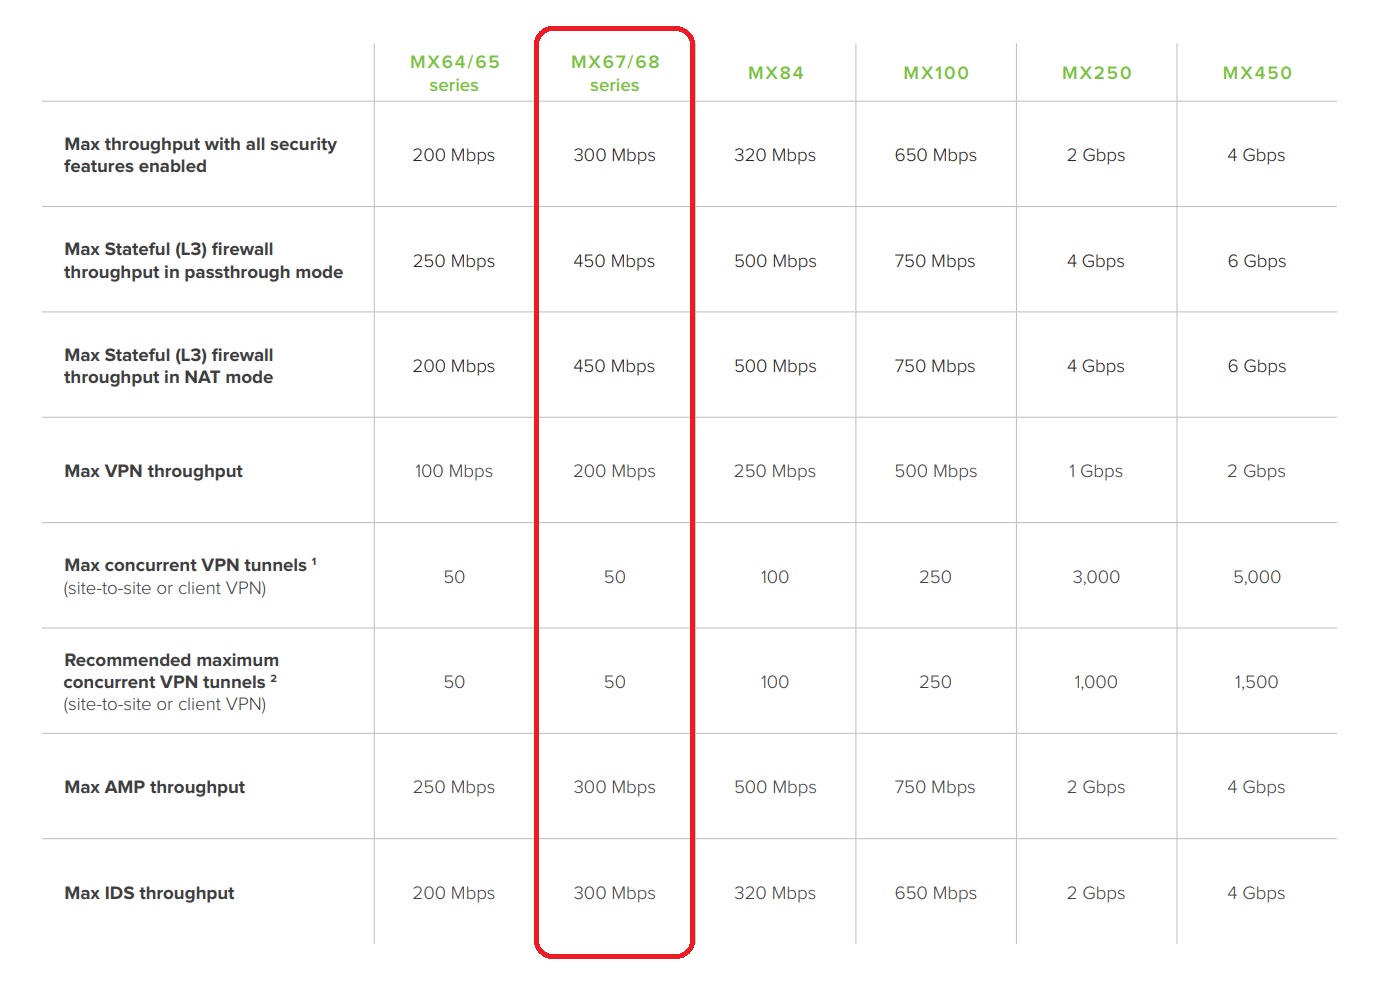
Meraki has a complete MX Sizing Guide that you can review to help you decide which model you want to purchase.
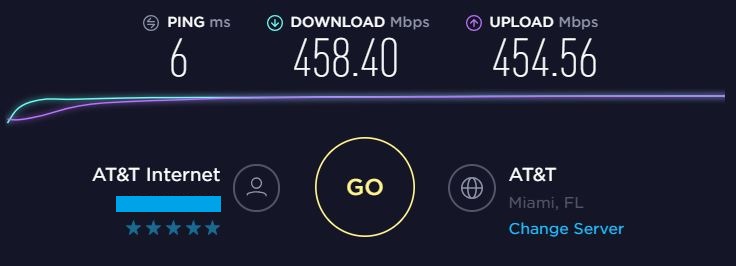
I’m lucky enough to have AT&T Gigapower Fiber Internet at home, so I can get 1Gbps synchronous/symmetrical speeds. Which is perfect for testing out an older MX64 compared to a new MX67C.
BASELINE – No MX Appliance
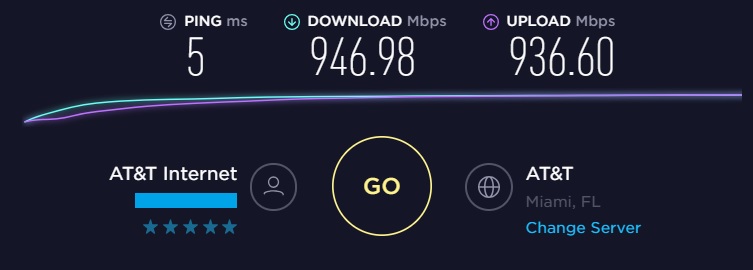
MX64

MX67C
Warm Spare Mode
Feel free to review the official Meraki guide on how to configure/setup Warm Spare mode, as I won’t be going over every detail.
The TLDR version that I used was as follows:
- Create new permanent network
- Add Primary-MX and wait for firmware to download etc.
- Setup your network how you see fit
- Create new temporary network
- Add Secondary-MX and wait for firmware to download etc.
- Remove Secondary-MX so it is no longer on any network
- Delete the temporary network as it is no longer needed
Following the above will give you the ability to make sure that they are both running the same version of firmware before merging them, which is a requirement.
Once that is done, you’ll need to Enable the Warm Spare setup
You might see the PRIMARY/SPARE status indicators change state, as it takes a few moments for them to settle.
This is what you should see when your done.

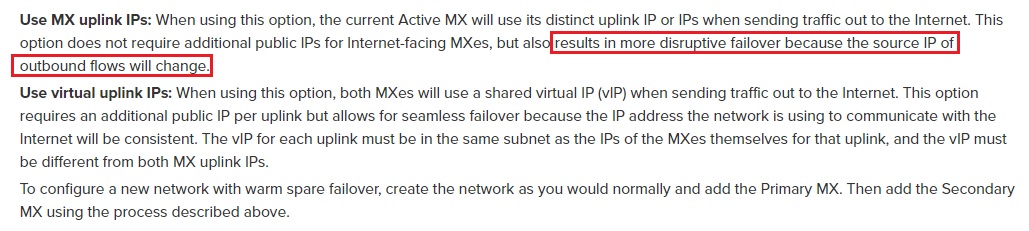
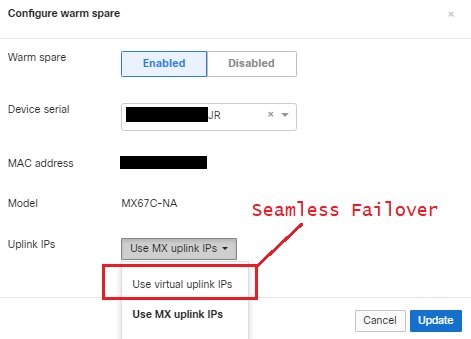
An important note to remember when deploying the warm spare setup, is if your requirement is real-time and seamless fail-over between them, this can only be achieved with the use of the virtual uplink IP’s (vIP).
Utilizing the vIP solution will require a /29 network from your ISP
Example:
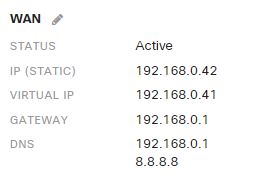
Network Address: 192.168.0.40/29
Usable IP: 192.168.0.41 – vIP
Usable IP: 192.168.0.42 – WAN1 – MX1
Usable IP: 192.168.0.43 – WAN1 – MX2
Usable IP: 192.168.0.44
Usable IP: 192.168.0.45
Usable IP: 192.168.0.46
Broadcast Address: 192.168.0.47
Subnet Mask: 255.255.255.248
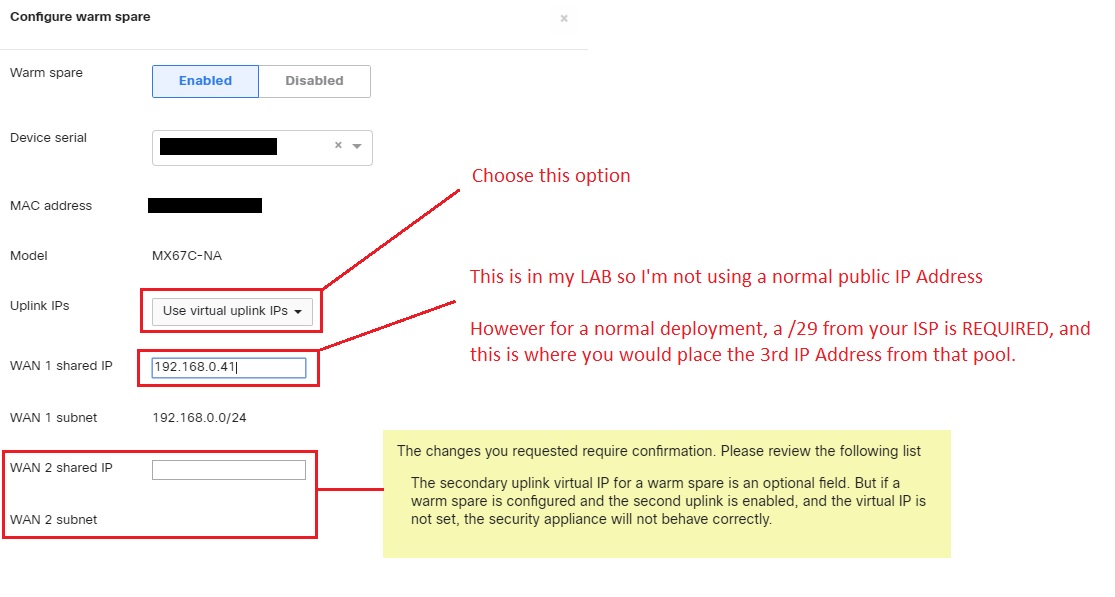
OPTION 1: Use the MX uplink IP’s
This method is the default, and is simpler/easier to implement. In addition it might be the only option since using the vIP method requires three WAN IP addresses, which requires the use of a /29 to achieve. This may not be an option for everyone.
Fail-over in this mode is still fairly quick, and most likely won’t be noticeable to anyone as long as nobody is doing any real-time voice or video calls. If I’m doing constant pings to the Internet, I usually see a ping drop once.
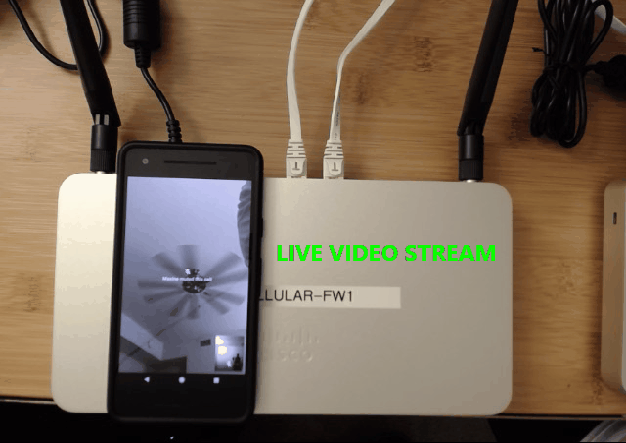
The video below show’s several seconds of outage when WAN 1 was disconnected.
The video below is using WhatsApp video call which will recover on its own even after several seconds of being down hard.
Wi-Fi Calling with this option will always drop the call for my tests.
Failover takes around ~2 to 4 seconds
OPTION 2: Use the virtual uplink IP’s
Utilizing the virtual IP scheme (vIP) will give you the fastest fail-over method available on the MX devices. There is only a small blip in the WhatsApp video stream. In addition, Wi-Fi Calling will only have a small audio blip and the call does not drop.
***Worth taking note is that I do not think that you will be able to utilize the vIP solution with the cellular interfaces, as I’m not aware of Verizon or AT&T providing /29 networks for their SIM cards. Correct me if I’m wrong?
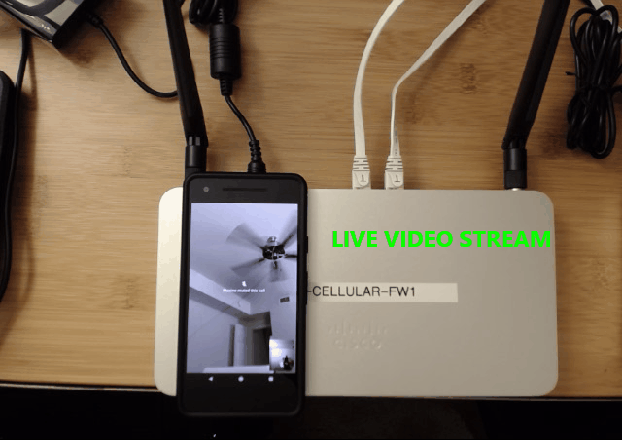
The video below show’s you how my WhatsApp video stream only had a minor blip before the stream continued.
VRRP
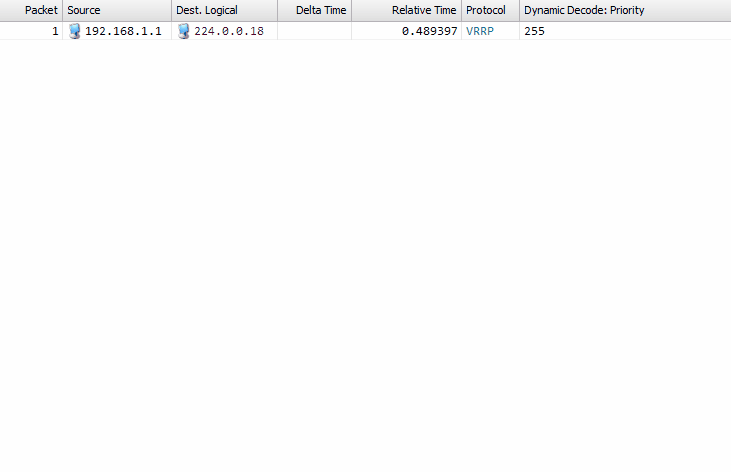
The Primary-MX will send VRRP (Virtual Router Redundancy Protocol) advertisements packets every second continuously. It ‘used’ to be a preferred design to have a direct Ethernet cable between Primary-MX and Secondary-MX, but this is no longer a valid solution per Meraki so this is to be avoided. The VRRP packets are designed to send out across all VLANs, so they are meant to go through your switch to reach the Secondary-MX and vice-versa.

When the Primary-MX loses all uplink connectivity, it will send a VRRP advertisement with a priority of 0, which means that the sender will no longer be sending VRRP packets.
There is little to no information about VRRP with the Cellular interfaces being used, so I decided to test this out for myself, by simulating what I did above, just without any actual WAN links, only Cellular connections.


Failover on cellular testing takes around ~3 to 6 seconds, so longer than using real WAN circuits. My best guess for this is a combination of added latency with LTE connections, but primary because Meraki does not monitor cellular uplinks per the HA guide here.
Cellular Failover Behavior
Meraki does not currently support any cellular failover with a high availability (HA) pair; as we do not perform connection monitoring on cellular uplinks (as of MX 10.X+), which is necessary for HA uplink failover. At this time, if a cellular uplink is used in an HA pair, the following will occur in order:
- Primary MX WAN 1+2 fails > fails over to Secondary MX
- Secondary MX WAN 1+2 fails > fails over to Primary MX Cellular
- Primary MX cellular fails > fails over to Secondary MX Cellular
While it is possible to use cellular failover as described above, it is not officially supported by Meraki.
If I made any mistakes in this blog post or if you feel that I am misunderstanding something please feel free to leave a comment and correct me and I can update this post.
Thanks !
-Nolan

Great job and great post!. Thanks Nolan
LikeLike